

Your patio cushions are the hardest-working part of your outdoor seating. They bake in the sun, soak up overnight rain, collect pollen in spring, and become a hiding place for insects by autumn. Without a simple storage routine, the fabric fades, the foam flattens, and the entire set needs replacing far too soon.
Storing patio furniture cushions correctly is one of the easiest ways to protect your investment and keep every outdoor chair comfortable. The good news is that it only takes a few focused hours once or twice a year. Finish the job on a warm, dry day, and you can relax outside in the evening — a simple pleasure that also helps you ease into a good night’s rest. For more on this, see our guide on how to store garden furniture cushions.
Why Proper Cushion Storage Matters
Most outdoor cushions combine a fabric cover with a foam core, usually polyurethane. Both materials fail for predictable reasons:
- UV light breaks down fabric fibers and fades dyes.
- Moisture encourages mold, mildew, and unpleasant odors inside the foam.
- Heat accelerates foam breakdown and makes it crumble over time.
- Pests and dust add physical damage, stains, and an uninviting surface to sit on.
Good storage controls all four factors. You do not need a huge garage or expensive bins — just a dry, shaded, ventilated space and a consistent routine.
One common mistake is assuming that because cushions survived a summer of rain and sun, they can handle a winter in the shed. They cannot. The protective finishes on outdoor fabric wear down over time, and cushions left exposed during the off-season are at their most vulnerable. For more on this, see our guide on how to make patio furniture cushions.
Before You Store: Read the Care Label
The fastest way to ruin a cushion is to treat it with the wrong cleaner. Every cushion or removeable cover has a care label, and that label should always come first.
Most outdoor cushions use one of these fabrics:
- Solution-dyed acrylic: fade-resistant and durable; clean with mild soap and avoid bleach.
- Polyester: common and easy to clean, but less UV-resistant; store away from direct light.
- Olefin or polypropylene: naturally resistant to moisture and mold, but it can absorb oily stains.
- Cotton or cotton-blend fabrics: comfortable and breathable, but they hold water longer and need extra drying time.
If the label is missing, test any cleaner on a hidden seam before applying it to the visible fabric.
Do a Quick Condition Check First
Before cleaning, inspect the zippers, stitching, straps, and clips. A tiny tear can become a large one while cushions sit in storage. Repair small tears with outdoor fabric tape or a needle and thread before washing. For more on this, see our guide on how to clean patio cushions.
If the foam is already crumbling or permanently flattened, washing will not restore it. At that point, a replacement is the more honest and comfortable option.
Step 1: Clean Cushions Before Storage
Never store a dirty cushion. Dirt holds moisture, attracts pests, and can set into stains that become impossible to remove later. For more on this, see our guide on how to store outdoor cushions.
Shake, Brush, and Vacuum
Take the cushions outside and shake them firmly to release loose dirt and dust. Follow with a soft-bristled brush to lift anything embedded in the fabric. A vacuum cleaner with a crevice tool works well along zipper tracks, seams, and piping.
If pollen is a concern, wear a dust mask while brushing. This simple step can also reduce night-time sneezing when the allergy season returns. For more on this, see our guide on how to measure your living room for furniture.
Spot-Clean Stains
Mix a few drops of mild dish soap with warm water. Dip a soft cloth into the mixture, wring it out, and dab the stain gently. Work from the outside edge of the stain toward the center to avoid spreading it.
Do not scrub hard. Rubbing damages the fabric’s protective finish and pushes the stain deeper. After cleaning, go over the area with a clean, damp cloth to remove soap residue.
Deep-Clean Removable Covers
If the cushion cover has a zipper, remove it and machine-wash on a cold, gentle cycle if the label allows. Always air-dry the cover rather than putting it in a tumble dryer, because heat can shrink it and weaken the fabric.
The foam core should never go in a washing machine. It absorbs water and may not dry completely, which leads to mildew. Instead, wipe the foam with a damp cloth and mild soap, then dry it thoroughly.
Rinse Away Every Trace of Soap
Soap left behind attracts dirt and can leave a sticky film. Rinse covers with clean water or wipe them with a clean wet cloth until no suds remain.
Step 2: Dry Cushions Completely (Non-Negotiable)
The single biggest cause of ruined cushions during storage is trapped moisture. Even well-cleaned cushions can develop mold if they are packed while slightly damp.
Air-Dry in the Shade First
Direct sunlight kills germs and speeds drying, but it also fades colors and weakens fibers. A better approach is to dry cushions in the shade with good airflow. Stand them on edge or prop them upright so air can move around both faces, and flip them after a few hours.
Check for Hidden Moisture
Use the back of your hand to feel the fabric. If it feels cool or damp, it is not ready. Open the zippers and feel inside the seams and corners. A musty smell is a reliable warning that moisture is still present.
Do not store any cushion until you are certain it is dry.
Speed Up Drying in Damp Weather
If the weather is humid or cloudy, use fans or a dehumidifier in a closed room to speed up the process. Do not use a space heater, heat gun, or tumble dryer. High heat can melt foam, shrink covers, and damage zippers.
If you notice mold before storage, clean the area quickly rather than sealing it in. The EPA’s mold guidance explains how to handle mold and moisture safely in the home.
Step 3: Choose the Right Storage Spot
Where you store cushions matters just as much as how you clean them. The ideal spot is cool, dry, dark, and ventilated.
Indoor Storage Is Usually Best
A spare closet, dry basement, or heated garage works well. Keep cushions off the floor on shelves, plastic pallets, or a clean wooden platform. Damp concrete and garage floors transfer moisture into foam overnight.
Think of the storage room the same way you think of the bedroom: small adjustments to room conditions protect the things you want to last.
Outdoor Storage as a Last Resort
If indoor space is not available, use a weatherproof deck box, shed, or covered porch. Raise the cushions off the ground, and never leave them leaning against an exterior wall. A waterproof cover provides protection, but you still need air to flow around the fabric.
Avoid Extreme Temperatures
Attics, uninsulated garages, and metal sheds can get dangerously hot in summer and freezing in winter. Both extremes damage foam. A storage area with a stable temperature, somewhere in the range of a normal living space, is ideal.
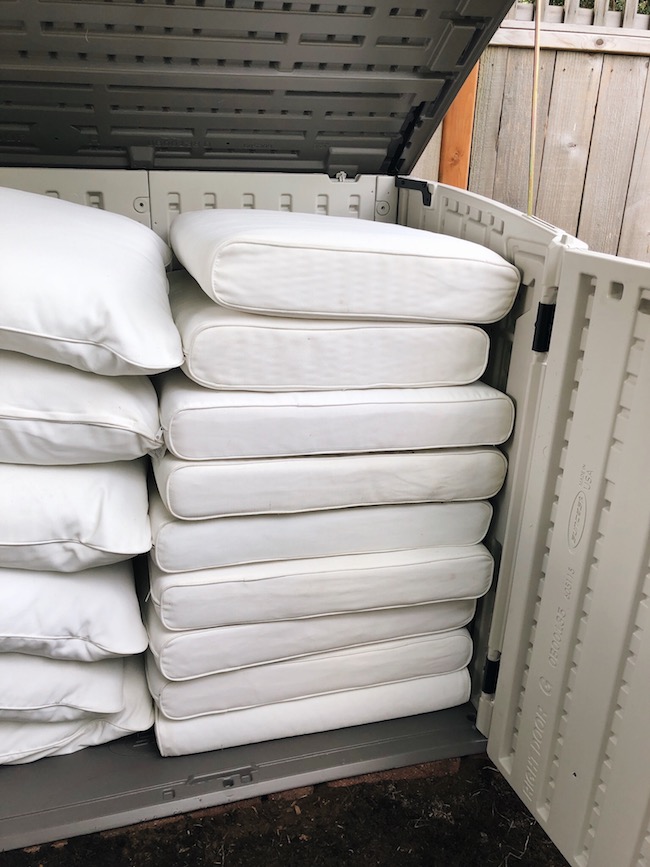
Image source: gluten-free-life.net
Upright storage on a shelf improves airflow and keeps cushions off damp surfaces.
Keep Humidity Under Control
High humidity is the fastest route to mildew. If your storage area feels damp, run a dehumidifier or place moisture-absorbing products nearby. Leave cushion bags partially unzipped or choose containers that breathe.
Step 4: Pack Cushions So They Can Breathe
The goal of packing is to keep dust and pests out without trapping moisture inside.
Skip Plastic Wrap
Plastic garbage bags and shrink wrap trap condensation. Temperature changes inside a shed or garage can cause water droplets to form on the inside of the plastic, soaking the cushion. A simple plastic bag may seem protective, but it often becomes a mold incubator.
Choose Breathable Covers
Cotton pillowcases, muslin, canvas totes, and mesh bags all work well. They block dust, allow air movement, and reduce the risk of trapped moisture. Specially designed cushion storage bags with vents are another reliable choice.

Image source: www.amazon.com
A zippered, breathable storage bag keeps cushions clean without sealing in moisture.
Use Plastic Bins the Right Way
Clear, stackable storage bins are excellent for smaller cushions and lumbar pillows. Keep the lid slightly open, add a few small vent holes, or line the bin with cotton cloth to absorb condensation. If you seal a bin completely, the cushions inside must be 100 percent dry.

Image source: fj-outdoors.com
Clear bins make it easy to spot moisture or pests, but they still need ventilation.
Stack Without Crushing
Keep cushions flat and stack the heaviest ones at the bottom. Placing them upright on edge, like files in a drawer, also works well. Never pile heavy furniture, planters, or tools on top of the stack.
Cushion foam needs room to hold its shape. When it flattens, it stops supporting your lower back properly, and that can lead to evening back discomfort over time. It is the same pressure-relieving principle that keeps a mattress supportive.
Step 5: Protect Cushions From Pests
An undisturbed pile of foam and fabric looks like a free nesting site to mice, squirrels, and insects. A few simple precautions keep them out.
Natural Repellents That Actually Work
Cedar blocks, cedar chips, lavender sachets, and peppermint oil on cotton balls are all effective at discouraging pests. Refresh them every few weeks as their scent fades.
Avoid strong chemical mothballs unless you can tolerate the odor and keep them away from children and pets. Granular rodent poisons should never be placed near cushions because they create health risks.
Seal Entry Points in the Storage Area
Check sheds, garages, and cabinets for gaps around doors, vents, pipes, and windows. Use weather stripping, caulk, or expanding foam to close small openings. Keep cushions away from birdseed, pet food, or grass seed, which attract rodents.
Inspect Every Few Weeks
Every two to four weeks, take a quick look inside the storage area. Check for droppings, gnaw marks, nests, and insect activity. If you find any, remove the cushions immediately, disinfect the area, and address the entry point.
A pest-free storage zone also keeps allergens out of the living space, which protects overall rest and makes the area safer for everyone in the house.
Step 6: Maintain Cushions During the Off-Season
Cushions do not need daily attention while stored, but a little monthly care goes a long way.
Fluff and Rotate
Press and release the foam to restore its loft, and rotate the stack so one side does not carry theweight for months on end. Flipping the stack each month distributes pressure evenly and keeps the cushions plump.
Check for Mold and Mildew
On each inspection, look for dark specks, white fuzz, or a musty odor. Catching mildew early is far easier than treating a full infestation. If you spot any, clean it immediately with a diluted vinegar solution or mild soap and water, then dry the cushion thoroughly before returning it to storage.
Air Them Out Occasionally
On a dry, sunny day, take the cushions out of storage for a few hours. A little fresh air keeps the fabric from feeling stale and lets any residual moisture escape. Do not leave them in direct sunlight for long stretches—an hour or two is plenty.
Step 7: Refresh Cushions Before the Next Season
When spring rolls around, do not toss the cushions straight onto the chairs. Give them a short reset.
Air Out and Inspect
Leave the cushions outside in the shade for a few hours. Check zippers, seams, and Velcro straps. Tighten any loose stitching and replace worn zippers before you need them.
Spot-Clean and Refresh the Scent
Give the cushions a quick wipe with mild soap and water if they picked up dust during storage. A fabric refresher spray, used sparingly, adds a clean scent without overwhelming the space.
Reintroduce Them Gradually
Bring cushions out into the sun for short periods, gradually increasing exposure over a few days. This lets the fabric adjust to harsher light and minimizes fading.
Frequently Asked Questions
How often should I clean my patio cushions?
In practice, a thorough cleaning is needed once or twice a year, usually before storage and again before the season starts. A quick weekly brush keeps dirt from building up.
Can I leave cushions outside if I use a waterproof cover?
A waterproof cover helps in the short term, but it should not replace indoor storage. Covers trap humidity, and condensation can form underneath. For long-term storage, bring cushions indoors.
What is the best way to store cushions long-term?
A cool, dry, dark room with breathable covers and proper stacking is best. If you only have outdoor space, use a vented deck box with an air gap below the cushions.
How do I get mildew off a cushion?
Mix one part white vinegar with three parts water, apply it to the affected area, let it sit briefly, then scrub gently and rinse thoroughly. Dry completely before storing.
Should I dry-clean or machine-wash my cushion covers?
Always follow the care label. Most outdoor covers are machine-washable on a cold, gentle cycle. Dry them flat or hang them; never use a tumble dryer.
Conclusion
Storing patio furniture cushions is one of those small seasonal tasks that pays off all year. Clean them thoroughly, dry them completely, keep them in a cool and ventilated spot, and protect them from pests. A few minutes of care every few weeks keeps the foam supportive, the fabric vibrant, and the whole set ready when warm weather returns.
The same principle that keeps a good mattress comfortable applies to patio cushions: consistent, gentle care and a protective environment make everything last longer. Whether your space is a tiny balcony or a sprawling deck, this routine is affordable, simple, and effective.
Start with one set this weekend—just the cleaning and drying steps—and you will immediately notice the difference next season. Your cushions will keep their shape, your chairs will stay inviting, and you can spend less time maintaining and more time enjoying the outdoors.

Daniel Hart is a consumer product analyst who specializes in mattress technology, smart bedding, and home comfort innovation. Before joining Royal Comport, Daniel worked with several e-commerce research teams, testing and comparing sleep products for quality, value, and long-term performance. He brings data-driven insight and real-world testing to every review he writes.


