

Your couch still looks great, but the cushions have gone flat. They sag in the middle, feel lumpy, and no amount of fluffing brings them back. If your cushions don't have zippers, you might think replacement is the only option—but it isn't.
Restuffing zipperless cushions is a straightforward DIY project that costs a fraction of what new cushions would. With basic sewing supplies, the right filling, and about an hour of your time, you can restore that "new couch" feel. This guide walks you through every step, from opening the seam to closing it invisibly. For more on this, see our guide on how to clean couch cushions from pee.
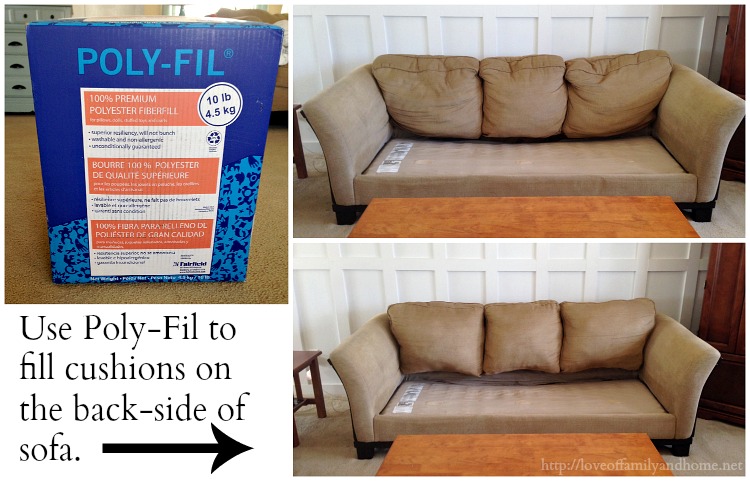
Gathering your filling and tools before you start makes the job go much faster.
Why Cushions Go Flat (And Why You Should Fix Them)
Cushions lose their shape for three main reasons: foam compression, fiberfill breakdown, and fabric stretching. High-traffic seating areas compress foam cells over time, while polyester fiberfill gradually loses its loft. The result is a cushion that looks tired no matter how often you flip it.
Replacing the filling offers several benefits beyond appearance:
- Cost savings: New filling costs $15–$50 depending on cushion size, versus $100–$300 for replacement cushions
- Custom comfort: You control the firmness, unlike store-bought replacements
- Environmental benefit: You keep existing furniture out of landfills
A common mistake is assuming all cushions need the same treatment. Back cushions often need soft fiberfill, while seat cushions benefit from firmer foam. Assess each cushion individually before deciding what to use. For more on this, see our guide on how to clean feather couch cushions.
What You'll Need: Materials and Tools
Having everything within reach prevents mid-project frustration. Here's what the job requires:
Filling Options
| Filling Type | Best For | Firmness | Lifespan |
|---|---|---|---|
| High-density foam | Seat cushions | Firm | 5–10 years |
| Memory foam | Pressure relief | Medium-firm | 5–8 years |
| Polyester fiberfill | Back cushions | Soft | 2–4 years |
| Down feathers | Luxury feel | Soft | Long with care |
| Foam-fiber blend | Balanced comfort | Medium | 4–6 years |
Tools for the Job
- Seam ripper for opening the seam without cutting fabric
- Strong thread (upholstery thread works best) and a heavy-duty needle
- Fabric scissors for trimming foam to size
- Measuring tape to ensure even filling amounts
- Chopstick or ruler to push filling into corners
- Gloves to protect your hands from foam dust and fiberglass irritants
Workspace Setup
Work on a clean, flat surface with good lighting. Lay down a sheet or drop cloth to catch loose filling. Keep your tools in a small tray so nothing gets lost in the stuffing. If you're working with foam, do it in a well-ventilated area—cutting foam releases small particles that can irritate your lungs.
Before You Start: Inspect the Cushions
Spend five minutes examining each cushion before opening anything. Look for:
- Tears or weak spots in the fabric that need reinforcing
- Stains that should be cleaned while the cover is empty
- The seam type—some are more accessible than others
This inspection saves you from discovering problems after you've already restuffed a cushion. If a cover is badly worn or stained, restuffing won't fix that. In that case, consider recovering the cushion entirely or consulting upholstery repair guides for more involved fixes. For more on this, see our guide on how to stop couch cushions from sliding.
How to Open Zipperless Cushions Safely
Opening the seam is the most delicate step. Done carelessly, you'll tear the fabric. Done carefully, you'll create a clean opening that's easy to stitch shut.
Finding the Right Seam
Look for the seam on the underside or back of the cushion. These areas are less visible, so your repair stitching will be hidden. Run your fingers along the seam to locate the stitches—you're looking for the seam where two fabric pieces meet. For more on this, see our guide on how to disinfect couch cushions.
Cutting the Seam
Use a seam ripper rather than scissors. A seam ripper's pointed tip slides between the stitches without cutting the fabric itself. Work in short sections:
- Insert the seam ripper under one stitch
- Push upward gently to cut the thread
- Move along the seam, cutting every third or fourth stitch
- Pull the seam open gently as you go
Leave the seam partially closed—you only need an opening large enough to reach inside. A 6–8 inch opening is usually sufficient.
A Note on Cushion Cores
Some zipperless cushions have an inner core wrapped in muslin or canvas. If you find one, you can often replace just the core filling without opening the outer cover at all. This is the easiest scenario: simply remove the inner bag, replace its filling, and slide it back into the cover. For more on this, see our guide on how to fix sagging couch cushions.
Choosing the Right Replacement Filling
The filling you choose determines how the cushion feels and how long it lasts. Match the filling to how you use the cushion.
Foam Inserts for Firm Support
High-density foam is the most durable option for seat cushions. It provides firm support that holds its shape for years. You can buy foam by the sheet and cut it to size with an electric knife or serrated blade.
Memory foam offers contouring comfort but retains heat. It also feels different from traditional couch foam—some people love the body-hugging feel, others find it too soft for sitting.
Polyester Fiberfill for Softness
Fiberfill is lightweight, affordable, and easy to work with. It's ideal for back cushions and decorative pillows. The downside: it compresses faster than foam and needs regular fluffing.
For better longevity, look for high-loft fiberfill designed for upholstery rather than craft-grade filling. Upholstery-grade fiberfill has longer fibers that resist matting.
Combination Approach
Many professional upholsterers use a layered approach: foam core for structure, wrapped in fiberfill for softness. This gives you the best of both worlds—the foam provides support, while the fiberfill creates a plush surface.
As a practical guideline, seat cushions need about 1–2 inches of additional thickness to compensate for compression. If your original cushion was 5 inches thick, start with a 4-inch foam core and add a fiberfill wrap.
Step-by-Step: Restuffing Without Zippers
With your seam open and filling ready, here's the full process:
Step 1: Remove Old Filling
Reach inside and pull out the old filling in manageable handfuls. Wearing gloves is wise—old foam can be dusty and may trigger allergies. Place the old filling directly into a trash bag.
Step 2: Clean the Cover
Once empty, vacuum the inside of the cover to remove dust and debris. This is also a good time to spot-clean any stains on the fabric surface. Let the cover dry completely before restuffing.
Step 3: Insert New Filling
For foam cores, slide the foam into the cover first, then add fiberfill around the edges for a softer feel. For fiberfill-only cushions, stuff in small handfuls, pushing each addition into the corners with a chopstick or ruler.
Step 4: Check the Fill Level
The cushion should feel slightly overstuffed—it will settle and compress with use. If you can easily pinch the fabric, add more filling. If the cushion feels like a rock, remove some.
Step 5: Test the Cushion
Before closing the seam, place the cushion on your couch and sit on it. This is your chance to adjust the filling before committing to stitching. A common mistake is closing the seam too early, then discovering the cushion is too soft.
Closing the Cushion: 4 Methods Compared
You have several options for closing the seam, each with trade-offs.
1. Ladder Stitch (Invisible Finish)
The ladder stitch creates a nearly invisible seam that's strong and durable. It's the professional choice.
- Thread a needle with upholstery thread
- Knot the end and insert the needle inside the fold of one fabric edge
- Take small bites of fabric alternately from each side, pulling the thread tight every few stitches
- Continue until the opening is closed
The name comes from the ladder-like pattern the thread makes before you pull it tight. With practice, the seam becomes invisible from the outside.
2. Whip Stitch (Quick and Simple)
The whip stitch is faster but more visible. It works well for cushions where the seam is on the bottom or back.
Insert the needle through both fabric edges, wrap the thread over the top, and repeat. Keep your stitches small and evenly spaced for a neat appearance.
3. Fabric Glue (No-Sew Option)
Fabric glue works for small openings and low-traffic cushions. Apply a thin line of glue to one edge, press the edges together, and hold for 30 seconds. Let it cure fully before using the cushion.
The trade-off: glue is less durable than stitching and makes future restuffing more difficult. Use this method only for decorative cushions that won't see heavy use.
4. Velcro or Snaps (Accessible Option)
Adding Velcro or snaps turns your zipperless cushion into one that's easy to open again. This is ideal if you anticipate needing to fluff or replace filling regularly.
Attach Velcro strips or snaps to both sides of the seam opening, then press together. This method is quick and functional, though the closure may be visible.
Shaping and Fluffing After Restuffing
Once your cushion is closed, proper shaping ensures it looks and feels right.
Even Distribution
Press the cushion firmly on a flat surface to settle the filling. Use your hands to push filling from the center toward the edges. Flip the cushion and repeat. This redistributes any clumps and creates a smooth, even surface.
Initial Fluffing
Give the cushion a few firm shakes and pats. This fluffs the fiberfill and helps it expand to fill the cover completely. For foam cores, the cushion may feel stiff initially—it will soften within a few days of regular use.
Maintaining Firmness Over Time
Regular maintenance extends the life of your restuffed cushions. The approach is similar to caring for your mattress—regular rotation and gentle handling make a real difference. For best results:
- Flip cushions weekly for the first month
- Fluff back cushions daily
- Rotate seat cushions monthly
Maintaining Restuffed Cushions
Your restuffed cushions will last longer with simple, consistent care.
Daily and Weekly Habits
Plump cushions every morning when you make your bed or tidy the room. A quick pat and shake redistributes the filling before it settles into flat spots. Weekly, flip seat cushions to distribute wear evenly.
Cleaning Without Damage
Vacuum cushions with a soft brush attachment to remove dust and pet hair. For stains, spot-clean with a mild soap solution and a damp cloth—avoid soaking the fabric, as moisture can damage both the cover and the filling.
Let cushions dry completely before returning them to the couch. Wet filling can develop odors and mildew.
Troubleshooting Common Problems
Even with careful work, issues can arise. Here's how to handle them.
Lumps and Uneven Spots
Lumps indicate the filling has clumped together. Reach through the seam opening and break apart the clumps by hand. For fiberfill, tear it into smaller pieces before inserting—this prevents clumping from the start.
Filling Leakage
If filling escapes through the seam or fabric, the closure isn't tight enough. Restitch with smaller, closer stitches. For foam cushions, consider wrapping the foam in a muslin cover before inserting it into the outer cover—this contains any foam dust or crumbling particles.
Cushions That Won't Stay Fluffy
Some fillings simply don't hold up. If you've restuffed and the cushion still goes flat within weeks, the fiberfill quality is too low. Upgrade to upholstery-grade fiberfill or switch to a foam core.
When to Replace Instead of Restuff
Restuffing isn't always the right answer. Consider replacement when:
- The cover is damaged: tears, fraying, or broken seams beyond repair
- The frame is broken: if the couch itself is unstable, new filling won't help
- The fabric is badly stained: no amount of filling restores a ruined cover
If you're dealing with a sagging mattress rather than couch cushions, the approach is different—you may want to explore mattress toppers or replacement options instead.
Frequently Asked Questions
How do I open couch cushions without zippers?
Use a seam ripper to carefully cut the thread along the seam, working in short sections. This creates a clean opening you can later stitch closed.
What materials work best for restuffing cushions?
High-density foam for seat cushions, polyester fiberfill for back cushions, and a foam-fiber combination for balanced comfort. The choice depends on your preferred firmness and the cushion's location.
Can I sew cushions closed after restuffing?
Yes. The ladder stitch creates an invisible, durable finish. Use upholstery thread and a heavy-duty needle for the strongest hold.
How much does it cost to restuff cushions?
Most DIY restuffing projects cost $15–$50 in materials, depending on cushion size and filling type. Professional reupholstery typically costs $100–$300 per cushion.
How long do restuffed cushions last?
With quality filling and regular maintenance, restuffed cushions last 3–5 years. Foam cores last longer than fiberfill alone.
Conclusion
Restuffing couch cushions without zippers is a practical, budget-friendly DIY project that transforms tired furniture. With a seam ripper, needle and thread, and the right filling, you can restore your couch's comfort in about an hour per cushion.
The key steps are straightforward: open the seam carefully, replace the worn filling with quality material, and close the seam with a ladder stitch for an invisible finish. Regular fluffing and gentle cleaning keep your restuffed cushions feeling fresh for years.
Take a look at your couch cushions today. If they're sagging, lumpy, or just plain uncomfortable, you now have everything you need to fix them. Gather your supplies, set aside an hour, and give your couch the refresh it deserves.

Daniel Hart is a consumer product analyst who specializes in mattress technology, smart bedding, and home comfort innovation. Before joining Royal Comport, Daniel worked with several e-commerce research teams, testing and comparing sleep products for quality, value, and long-term performance. He brings data-driven insight and real-world testing to every review he writes.


