

The air you feed into your production line may look clean, but invisible moisture, oil vapor, and fine particles can quietly ruin equipment, compromise product quality, and endanger workers. If you rely on compressed air for anything from simple pneumatic tools to food packaging, you cannot afford to guess about its purity. Knowing how to check compressed air quality accurately—using the right tools, following a consistent sampling routine, and interpreting results against recognized standards—is the difference between proactive maintenance and costly downtime.
This guide walks you through every step: why quality matters, what contaminants to watch for, which instruments actually give you reliable data, and how to turn those readings into action. You will also learn how often to test, how to avoid common measurement mistakes, and how to keep your system within ISO 8573 purity classes—the global benchmark for compressed air quality.
Why Compressed Air Quality Matters
Compressed air is often called the “fourth utility” because so many processes depend on it. Yet many facilities treat it as an afterthought until a tool fails, a batch is rejected, or a worker reports breathing difficulties. The cost of poor air quality shows up in three areas:
Equipment Damage and Downtime
Water and particles accelerate rust, corrosion, and wear inside pipes, valves, cylinders, and air motors. Wet air also washes away lubricants, causing seals to fail earlier than expected. Even a minor leak or blocked nozzle can drop pressure and reduce efficiency. Clean, dry air keeps components running smoother and extends their service life, directly lowering your repair and replacement budget.
Product Quality and Compliance
Industries like pharmaceuticals, food and beverage, electronics, and painting require very clean air because contaminants can end up in the final product. A single droplet of oil or a few grains of dust can ruin a microscopic circuit board or make a food batch unsafe. Beyond quality, many sectors must meet regulatory and customer-specified purity levels—failing to do so can lead to fines, product recalls, and loss of contracts.
Worker Health and Safety
Breathing air that contains oil aerosols, microorganisms, or fine particulates can cause respiratory irritation, allergies, and more serious illnesses. In poorly ventilated spaces, the risk increases. Beyond the health and safety compliance angle, clean air contributes to a more comfortable, productive work environment. For example, poor air quality can also disrupt sleep quality for workers, which has long-term health and performance consequences—something to consider if you’re already thinking about the broader workplace environment. Learn more about how sleep disturbances affect health and why a clean environment supportsthat.
Understanding ISO 8573: The Global Standard
Before you test, you need a reference point. The international standard ISO 8573 defines compressed air purity in three categories: particles, water, and oil. Each category is split into classes (1 is cleanest, 9 is dirtiest for particles; 1–10 for moisture; 1–4 for oil). For example, a typical food plant might require Class 2 for particles, Class 4 for water, and Class 2 for oil.
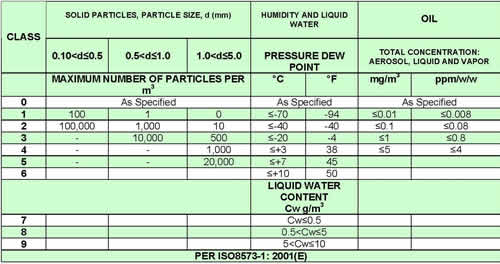 Reference the ISO 8573 purity classes when comparing test results.
The standard also specifies test methods for each contaminant type, so you can choose a suitable approach based on your industry and risk level. Many equipment manufacturers publish the ISO class their products require—always check that before selecting a testing method. Regulatory bodies like OSHA set workplace safety limits for breathing air, but ISO 8573 is your day‑to‑day diagnostic tool for process air.
Common Contaminants and Their Effects
Compressed air will almost always contain some level of contamination unless you actively remove it. Here are the four main categories to monitor:
- Moisture – Water vapor condenses when air cools, collecting in pipes and tools. This leads to rust, corrosion, freezer plugging in pneumatic logic, and product spoilage in packaging.
- Oil and lubricants – Oil can come from the compressor itself, from worn seals, or from upstream processes. Even tiny amounts can contaminate food, paint, or sensitive electronic components.
- Particulate matter – Dust, rust flakes, and pipe scale get swept into the airstream. These particles abrade nozzles, clog filters, and damage pneumatic instruments.
- Microorganisms – In humid conditions, bacteria and mold can grow in the system. This is a serious hazard in food, pharmaceutical, and medical applications where sterile air is required.
Recognizing these contaminants is the first step. The second step is knowing which tool will detect each one.
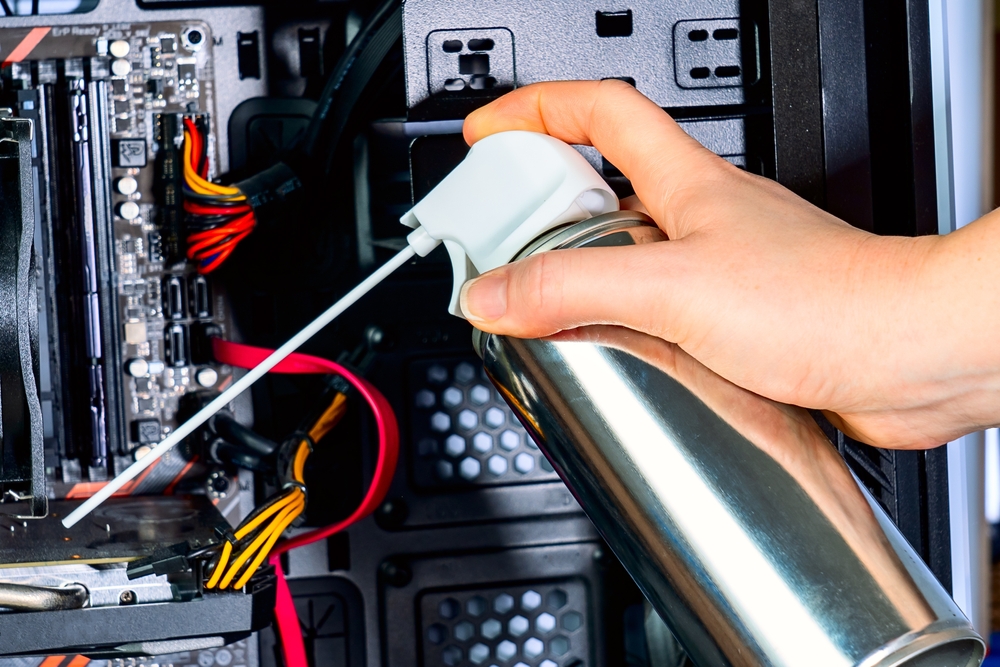 Compressed air is often stored in pressurized canisters for portable testing.
Tools and Equipment for Accurate Testing
You don’t need a full laboratory to get reliable numbers. Several portable, on‑site instruments can give you immediate feedback, while laboratory analysis remains the gold standard for legal documentation. Here’s what you can use:
Moisture Analyzers (Dew Point Meters)
These measure the temperature at which water vapor condenses—the dew point. A lower dew point means drier air. For compressed air, you typically want a dew point of -40°C or lower for most industrial applications. Modern handheld meters give you the dew point in seconds, and some log data for later download. Calibrate them regularly against a known reference, because even a small error in dew point can mislead you.
Particle Counters
Optical particle counters use a laser to size and count particles in real time. They sample air at a fixed flow rate and report the number of particles per cubic meter for sizes ≥ 0.1 µm, ≥ 0.5 µm, etc. This is essential if you need to meet ISO 8573 particle classes. Keep the sensor clean and ensure the flow is stable—dirty glass or an uneven pull can skew results.
Oil Vapor Detectors
Oil in compressed air can exist as liquid droplets, aerosol, or vapor. Vapor is the hardest to detect. There are two main types: color‑changing tubes that give a semiquantitative reading, and handheld photo‑ionization detectors that give a digital ppm value. For low‑level oil detection (parts per billion), lab analysis using a solvent extraction method is more accurate.
Pressure Gauges and Flow Meters
While not directly measuring purity, these tell you about the system’s health. A sudden pressure drop could indicate a blocked filter, a leaking valve, or too much moisture freezing in a line. Monitoring pressure alongside quality gives context to your test results.
Portable Test Kits vs. Laboratory Analysis
Portable kits are convenient for routine checks and quick troubleshooting. Laboratory analysis (sending a sample to an accredited lab) provides documented results that are defensible in audits and legal disputes. Many facilities use a hybrid: portable instruments for daily checks, and periodic lab tests for full certification.
Step-by-Step Guide to Testing Compressed Air
Follow this sequence to get consistent, accurate readings every time.
1. Choose the Right Sampling Point
Place your sampling point as close to the point of use as possible—not right at the compressor outlet. Air quality changes as it travels through pipes, dryers, and filters. Also avoid areas where condensate accumulates or where taps are rarely used. Take multiple samples from different points if your system is large.
2. Calibrate Your Instruments
Calibration is non‑negotiable. Check the manufacturer’s instructions, use certified reference gases or humidity standards, and document the calibration date. A meter that’s off by 5% can push you from a passing class to a failing class without you realizing it.
3. Purge the Sampling Line
Before you take a reading, open the sampling port and let air flow for 2–3 minutes. This flushes out stagnant air and condensed water that may have collected. Use a clean, dry hose that won’t add its own contaminants.
4. Record Baseline Data Simultaneously
Note the system pressure, ambient temperature, relative humidity, and compressor load at the moment you take the air sample. These factors influence contaminant levels. By recording them, you can compare results across different times of day or production runs.
5. Collect Multiple Samples
Don’t rely on a single reading. Take at least three samples, spaced a few minutes apart, and average the results. This flattens out short‑term fluctuations caused by compressor cycling or intermittent air usage.
6. Interpret Results Against ISO 8573
Once you have your numbers, compare them with the purity class your application requires. If any contaminant exceeds the threshold, you have a problem to fix—not just a data point. Use the results to decide whether you need further filtration, a better dryer, or more frequent maintenance.
7. Document Everything
Keep a log of dates, locations, instrument IDs, calibration records, and the actual readings. This isn’t bureaucratic busywork—it’s evidence of compliance that auditors and customers will ask for. Digital logging makes this easier.
Maintaining and Improving Air Quality
Prevention beats correction. Once you’ve identified deficiencies, take these steps:
- Upgrade filtration – Install multi‑stage filters (coalescing, particulate, activated carbon) sized correctly for your flow. Change elements based on pressure differential, not just on a calendar.
- Improve drying – If your dew point is too high, consider switching from a refrigerated dryer to a desiccant dryer, or add a pre‑dryer. Dry air prevents corrosion and microbial growth.
- Fix leaks – Leaks not only waste energy but also allow atmospheric moisture and dirt to enter the system. Use ultrasonic detectors to find them, then repair promptly.
- Keep the compressor room clean – The intake air that enters your compressor sets the baseline quality. Make sure the air intake is away from exhaust fumes, dust, and chemicals.
Common Challenges and How to Overcome Them
Even with the right tools, you might encounter issues that make testing frustrating. Here’s how to handle the most common ones:
- Inconsistent readings – Often caused by poor sensor placement or unstable flow. Place the sensor where air velocity is steady, take multiple samples, and check for intermittent dryer regeneration cycles that can spike humidity.
- Equipment limitations – No single device measures everything. Don’t expect a particle counter to detect oil vapor or a dew point meter to find bacteria. Use complementary tools and understand each device’s detection range.
- Environmental interference – Direct sunlight, nearby heat sources, or drafts from cooling fans can alter readings. Keep the testing area shielded and stable. Also, beware of high ambient humidity when the compressor draws intake air in humid months—your readings might reflect the season, not a real problem.
How Often Should You Test?
There’s no one‑size‑fits‑all answer. The frequency depends on your industry, the criticality of your processes, and your history of quality problems. As a practical guide:
| Application | Recommended Frequency |
|---|---|
| General industrial – tools, cleaning | Monthly check of dew point and pressure; quarterly full contaminant test |
| Food & beverage | Weekly particle and oil checks; monthly full ISO 8573 analysis |
| Pharmaceutical / medical | Continuous monitoring where possible; documented lab test after every major maintenance event |
| Electronics manufacturing | Weekly particle and dew point checks; pre‑production batch testing |
Also test after any major system change: a new compressor, filter replacement, or dryer repair.
Best Practices and Common Mistakes
Best Practices:
- Use a standardized sampling procedure so results are comparable over time.
- Keep a dedicated set of instruments for critical systems—don’t swap them between locations without re‑calibration.
- Train operators on how to use the tools and how to interpret basic readings. A common mistake is assuming a green light means “good enough” without checking the recorded values.
Common Mistakes:
- Testing right at the compressor outlet instead of at the point of use.
- Ignoring the operating pressure when taking dew point readings—dew point changes with pressure.
- Forgetting to purge the line before sampling, which leads to false high moisture readings.
- Using a portable filter on the sampling line that removes the very contaminant you’re trying to measure.
Frequently Asked Questions
What does “compressed air quality” actually mean?
It refers to the levels of moisture, oil, particles, and microorganisms in the air stream, usually measured against ISO 8573 purity classes.
How often should I calibrate my air quality instruments?
Follow the manufacturer’s recommendation—typically every 6–12 months. In critical applications, calibrate before each major test batch.
Can I improve compressed air quality without buying new equipment?
Yes. Start by fixing leaks, ensuring proper drainage of condensate, and replacing filter elements at the right time. These simple steps often resolve many issues.
What is the best way to measure oil in compressed air?
For quick checks, use a color‑indicating tube or handheld oil vapor detector. For high‑accuracy documentation, send a sample to a lab using a standard method like ISO 8573‑5.
Conclusion
Checking compressed air quality doesn’t have to be a mysterious laboratory exercise. With a clear understanding of ISO 8573 classes, reliable portable instruments, and a consistent sampling routine, you can catch problems before they become expensive failures. Regular testing protects your equipment, your products, and your people—and it gives you the data you need to maintain compliance confidently.
Start simple: check your dew point and pressure drop this week. Then build a full testing schedule that fits your industry’s risk level. If you need more guidance on creating a healthy, efficient work environment—including the air you breathe and the way it affects overall well-being—explore additional resources in our blog. For a deeper dive into how air quality interacts with health and recovery, you’ll find practical tips on topics like allergens that affect breathing and creating a restful sleep environment. Your equipment and your team deserve clean, dry air—so take that first measurement today.

Daniel Hart is a consumer product analyst who specializes in mattress technology, smart bedding, and home comfort innovation. Before joining Royal Comport, Daniel worked with several e-commerce research teams, testing and comparing sleep products for quality, value, and long-term performance. He brings data-driven insight and real-world testing to every review he writes.


