

A perfectly fitted cushion transforms an outdoor space. It looks intentional, stays put through gusty evenings, and actually supports your body when you settle in with a book. The wrong one—too wide, too shallow, the wrong thickness—slides around, fades unevenly, and makes your patio furniture feel older than it is. I have helped friends, neighbors, and clients swap out cushions on everything from deep lounge sofas to vintage wrought-iron bistro chairs. The single factor that separates a successful replacement from a frustrating return is simple: accurate measurements. This guide walks you through exactly how to measure replacement outdoor cushions, covering the tools, techniques, and fine details that most online guides skip.
Know What You Are Measuring
Before picking up a tape measure, identify what you're replacing. The approach changes depending on whether you're buying a complete cushion, just a replacement foam insert, or a new cover for an existing foam base.
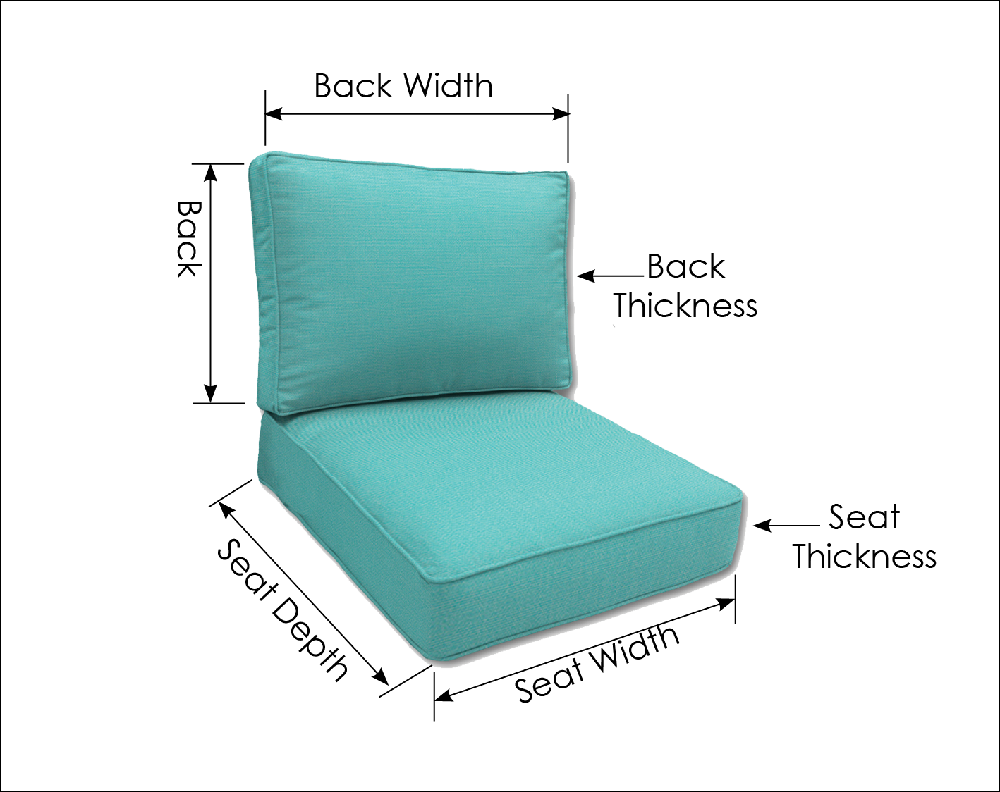
- Complete cushion: You need the finished exterior dimensions—width, depth, and thickness—including any piping, welting, or seams.
- Foam insert only: Measure the foam itself, not the cover. This is critical because a cushion cover adds up to an inch of material around every side.
- Cover only: Measure the finished cushion size, then check whether the vendor wants the interior cover size or the exterior finished size. These differ.
Most custom cushion makers ask for finished dimensions. Knowing this distinction up front saves you a frustrating email exchange later.
Gather Your Measuring Tools
You don't need anything complicated, but the right tools make the job faster and more accurate.
- Soft tape measure – Essential for curved edges, rounded corners, and measuring around piping. The flexible nature of a fabric tape conforms to shapes a rigid ruler can't handle.
- Straight edge or yardstick – Useful for spanning across deep cushions to get a true width, and for checking that your measurements are level.
- Pen and paper or a notes app – Write down every measurement immediately. Never trust memory, especially when measuring multiple cushions.
- Masking tape and a marker – Label each cushion (e.g., "Couch Left," "Couch Right," "Chair 2"). This prevents mix-ups when all your cushions look remarkably similar after a season in the sun.
- Camera – Take photos of each cushion in place, from multiple angles. Photograph the undersides, where frames and manufacturing labels often reveal original dimensions.
A common mistake is using a metal tape measure. It arcs over soft fill and gives you a distorted reading. The soft cloth tape is non-negotiable for anything with a curve or plushness.
Prepare Your Workspace
Measure on a flat, stable surface. A patio table works better than the ground. Make sure the cushion is lying naturally—not compressed, not fluffed up, and definitely not squashed under a second cushion. If the cushion has been sitting under a cover all winter, give it an hour in the sun to relax the fill before measuring. Compressed foam measures shorter than it will when properly expanded.
Step-by-Step Measuring Guide
Different cushion styles demand slightly different techniques. Here's the breakdown for the common types you'll encounter.
Box-Style Seat Cushions
This is the standard cushion you'll find on most patio sofas, loveseats, and dining chairs.
- Width: Measure across the front edge and across the back edge.
- Depth: Measure from the front edge straight back to the rear edge.
- Thickness: Measure from the top surface down to the bottom, at the center of the cushion—not at an edge where wear may compress the foam.
- Flange and welting: If the cushion has a flanged border (a flat, un-piped edge), measure the exposed top surface separately from the flange itself. For a welted cushion, the piping adds a small but measurable amount to the overall footprint. Include this in your notes.
Back and Arm Cushions
Back cushions are often tapered, wider at the bottom than the top. Arm cushions often have an L-shape or a curved front.
- Back cushions: Measure the width at the widest point (usually the bottom), the height from the bottom edge to the top, and the thickness at the center. Note any angled top or taper.
- Arm cushions: Measure the length along the top curve, the width of the seat surface, and the drop-down height. Sketch the shape and take a close-up photo from directly above.
Round and Bolster Cushions
- Round: Measure the diameter at the widest point across the center. Measure thickness in the middle.
- Bolster: Measure the length end to end, and the diameter across the circular face. If the bolster tapers to a smaller diameter at the ends, measure all three points: left end, center, and right end.
Corner and Wedge Cushions
Corner sofas are the most difficult to measure correctly because the cushion is often not a true square.
- Measure the length of each side that forms the corner.
- Measure the angle between them with a protractor if you have one. If not, a photo taken from directly overhead will help the maker more than any guess.
- Measure the depth and thickness as you would for a standard seat cushion.
Tufted or Irregular Cushions
Tufting pulls fabric down into the fill, which shortens the surface length compared to a similar untufted cushion.
- Count the tufts: Note the number and their pattern.
- Measure finished top size: Measure the visible top surface, not the fully stretched size.
- Photograph the underside: The tuft buttons are often visible from the bottom, and this photo helps a maker reproduce the pattern.
Pro tip: For any cushion that sits inside a frame, measure the frame's interior opening. A cushion measured from the outside of the frame will almost always be too big.
Handling Odd Shapes and Custom Configurations
Some outdoor seating is simply not a rectangle. L-shaped sectionals, curved banquettes, and chaise lounges with built-in wedge sections require a different strategy.
- Trace it: Place the cushion on a large sheet of butcher paper or cardboard. Trace the exact perimeter with a marker. This gives you a precise template that no list of numbers can match.
- Grid it: Place the traced paper on a grid (1-inch or 2-inch squares). Count the squares and note the coordinates of the corners. This is a technique patterns makers use, and it translates perfectly to cushion making.
- Photograph with scale: Place a ruler or a standard 8.5 x 11 inch piece of paper next to the cushion when you photograph it. This gives the manufacturer a visual reference for proportion.
When you order a custom shape, always mention whether your measurements represent the interior cover size or the finished exterior size. Many vendors need you to specify this, and getting it wrong is the most common reason for a "custom" cushion that doesn't fit.
Tracing odd shapes onto paper yields a template far more accurate than any list of measurements.
Source: cascadiaoutdoorcushions.com
Measure the Frame, Not Just the Cushion
This is where experience separates good measurers from great ones. A new cushion should fit the frame, not necessarily match the old cushion's exact dimensions. Old cushions lose their structure. An old cushion with flattened foam might measure 21 inches deep, but the frame opening is 20 inches. If you replace with a new 21-inch cushion, it will bulge and strain against the frame.
Always measure the interior of the frame where the cushion will reside. Measure the opening's width and depth. Then measure your existing cushion. If the cushion has stretched or sagged, you'll likely want to order closer to the frame dimensions, or possibly a half-inch smaller to allow for the new cushion's plumpness.
Extra Measurements That Matter
The basic width, depth, and thickness are just the starting point. Savvy buyers also check:
- Diagonal length: For a square cushion, measure across the diagonal. If this measurement is off, your "square" cushion is actually a parallelogram, and it won't sit flush in a square frame.
- Tie and strap placement: High winds and active kids mean many outdoor cushions use ties to stay in place. Measure the distance of the ties from the edges of the cushion. If replacement ties are at a different location than your frame's anchor points, the new cushion won't secure properly.
- Zipper placement: The zipper can sit on the bottom, the back edge, or the side. For a replacement cover, note the zipper's exact location and length. For a replacement cushion, the zipper placement may be irrelevant, but it's good to note if you plan to remove and wash the cover.
- Tuck-in depth: For cushions that fit under a fitted slipcover or a deep seat well, measure the depth the cushion needs to tuck in below the frame lip. This hidden dimension affects the overall fit.
Choosing Thickness, Fill, and Fabric
While dimensions are the core of the job, the material choices affect how the final dimensions "feel" beture it's the size that matters most.
- Thickness considerations: Standard outdoor seat cushions range from 2 to 6 inches. Thicker does not automatically mean more comfortable. Firm 2-inch foam is excellent for dining chairs. Deep 6-inch foam with a soft top layer is better for lounging. Err on the side of replacing what you have unless you're intentionally changing the seat height.
- Fill and support: Foam holds its shape best. Fiber fill feels softer but sags quickly. Look for quick-dry foam if your cushions are exposed to rain or high humidity. It resists mold and mildew far better than regular open-cell foam. If you're replacing an insert to solve a back or hip discomfort, understanding the difference between support types matters. A firmer foam provides the structured support that a soft fiberfill simply can't offer, similar to the logic you'd use when exploring mattress technologies for your bedroom.
- Construction: Ask if the vendor uses a rail-road construction for the cushion's interior. A rail-road box construction is a standard technique for outdoor cushions that uses a foam block wrapped in batting and fabric. It produces a clean, crisp edge and better durability.
Ordering Your Replacement
Once your measurements are recorded, you're ready to order. Follow this checklist to avoid errors:
- Write measurements in inches: Even if you think in centimeters, most US cushion vendors work in inches. Convert all measurements to inches for clarity.
- Label multiple pieces: Write "Couch Left" and "Couch Right" clearly on your notes. Attach a piece of masking tape to the cushion itself.
- Specify finished size: State in your order that dimensions are finished exterior measurements.
- Ask about seam allowance: Some makers incorporate a seam allowance into their pattern; others require you to add it. Ask upfront. A 1/2-inch difference across the board can turn a snug fit into a sloppy one.
- Clarify foam density: If you're replacing an insert, ask for a specific density (e.g., 2.0 lbs per cubic foot, or 1.8 for a softer feel). Standard foam density for outdoor cushions typically falls in the 1.8 to 2.5 lb range.
- Request a fabric swatch: Color looks different on a screen than in person. Most reputable vendors will send a swatch for a small fee. This step saves the hassle of a full return.
If you are unsure about a measurement, or if the shape is at all unusual, call the vendor before ordering. A brief phone call can clarify details that a digital order form cannot. Involving a human reduces the chance of a costly mistake on custom work.

A labeled sketch and notes help prevent errors when ordering multiple cushions at once.
Source: wickerliving.com
Verify Before You Finalize
A consistent method for verification is invaluable.
- Round up or down: The exact measurement of a worn cushion is a compromise. Choose a width and depth that best fits the frame, not one that matches a sagging edge.
- Double-check symmetry: For a pair of matching cushions (e.g., two armchairs), measure both sides and compare. They are rarely identical after years of use.
- Use a digital level: Heavy, dense foam can compress unevenly. A small digital level ensures you're measuring thickness straight up and down rather than at an angle.
What to Do When New Cushions Arrive
Your work isn't quite done when the box arrives.
- Test-fit immediately: Place your new cushion in the frame right away. Look for gaps, overhangs, or an overly tight squeeze.
- Address minor adjustments intelligently: If a cover is slightly too large, you may be able to sew a new seam, but this is a permanent alteration. If the foam is too thick, do not try to trim it yourself unless you're using proper tools; you'll create a lumpy, uneven surface. Contact the maker first for advice.
- Secure properly: If your cushions don't have ties, add hook-and-loop fasteners or non-slip pads to prevent shifting. For coastal areas or patios prone to strong winds, removable straps that buckle to the frame are the most secure option.
- Follow care instructions: Wash the covers according to the manufacturer's label. Store cushions indoors or in a dry storage bin during the off-season. Proper storage dramatically extends cushion life. Investing in a good outdoor setup is a worthwhile part of creating a sleep environment that extends to your porch relaxation.
Preventing Sliding and Wear
A perfectly measured cushion that slides around every ten minutes is a nuisance. Before you order, consider how you'll secure it. Many frames have pre-drilled holes for securing ties, but few people use them. A simple set of Velcro strips, placed on the underside of the cushion and the top of the frame, does wonders. For a more permanent solution, consider snaps installed into the wood or metal frame.
The cushion's performance over its lifetime depends more on the maintenance than the initial fit. A cushion that is left outside in a downpour will develop mold and mildew, even if it uses quick-dry foam. A simple habit of flipping the cushions weekly (to distribute wear) and storing them in a dry place when not in use will significantly extend their lifespan. This simple practice is a small part of a broader approach to restful nights—a comfortable seat in the sun is its own kind of reset.
Frequently Asked Questions
Here are the questions I get asked most often when helping people size their outdoor cushions.
Should I measure the cover or the foam?
Provide the finished cushion size (the outside of the cover) unless you're buying only a foam insert. For foam inserts, measure the foam itself. A cover adds 3/4 to 1 inch around all sides, so the two measurements are never the same.
How much extra should I allow for seams?
Makers typically add 1/2 inch for seam allowance. Ask your vendor directly, because their standard can vary. Never assume your measurements include seam allowances. Specify clearly whether your figure is the finished size or the pattern size.
How do I measure an L-shaped cushion?
Measure each leg of the L separately. Note the angle where they meet. Photograph the joint from directly above—it's easier to show a maker an angle than to describe it in degrees.
What if my measurements are between sizes?
Order the larger size when in doubt, then adjust the fill. A 1/2-inch difference in width is far easier to correct with a bit of extra wrap or a shim than a cushion that's 1/2-inch too narrow to fill the frame.
Can I use a regular memory foam topper for my outdoor cushions?
No. Standard memory foam absorbs water and breaks down quickly outdoors. You need a closed-cell "quick-dry" foam designed for outdoor use. It won't offer the same sink-in comfort, but it will survive the elements and still provide good support. For supportive comfort indoors, you might look into how a mattress for specific needs can complement your sleep.
Is it okay to order just the foam insert and sew a new cover myself?
Yes, if you have the skill. Measure the foam insert precisely. Remember that a zippered cover must be slightly smaller than the foam to stay taut. It's easier to first order a cover from a pro, then use it as a pattern.
Conclusion
The difference between a cushion that fits and one that fights you is rarely a matter of luck. It's the result of precise, thoughtful measurement. It starts with identifying what kind of product you're ordering, gathering the right tools, and measuring the interior of the frame along with the old cushion. From there, you record your numbers, photograph odd shapes, and communicate the finished dimensions clearly to the manufacturer.
Taking these steps transforms the experience of replacing outdoor cushions from a gamble into a straightforward project. It saves you money on returns, time spent on frustrating exchanges, and the lingering annoyance of furniture that doesn't look right.
Don't get bogged down in complexity. One accurate measurement today is worth a dozen corrections tomorrow. Ordering correctly the first time means you get to actually enjoy the season rather than spend it waiting on a replacement to replace the replacement. Whether you're refreshing a tired set for immersive relaxation or tackling a full outdoor remodel, start with a few minutes of careful measuring. The payoff is a space that looks tailored, feels comfortable, and holds up for years. If you're still unsure about a tricky shape, capture a photo and leave a comment below—knowing how to measure correctly is the first step, and it's worth doing right.

Daniel Hart is a consumer product analyst who specializes in mattress technology, smart bedding, and home comfort innovation. Before joining Royal Comport, Daniel worked with several e-commerce research teams, testing and comparing sleep products for quality, value, and long-term performance. He brings data-driven insight and real-world testing to every review he writes.


