
Make piping by covering cording with fabric strips and sewing it into the cushion seam.
I have made dozens of cushions and taught piping techniques for years. In this guide I show exactly how to make piping for cushions with clear steps, tool lists, and real tips from my shop. You will learn how to choose fabric, cut and cover cord, sew neat corners, and attach piping for a clean, professional finish. Read on to master piping and give your cushions a polished look.
Materials and tools you need
Piping is simple with the right gear. Gather these items before you start.
- Fabric suitable for piping, cut on grain or bias for curves. Use the same fabric as the cushion or a contrast for a trim.
- Piping cord or cotton-wrapped cord, 2–4 mm diameter depending on the look you want.
- Piping foot or zipper foot for your sewing machine to keep the cord close to the seam.
- Rotary cutter, mat, clear ruler, and sharp scissors for clean cuts.
- Pins or clips to hold piping in place while sewing.
- Thread that matches or contrasts, depending on style.
- Seam ripper and iron for corrections and pressing.
From my experience, a good piping foot makes stitching fast and neat. If you sew cushions often, keep a few cord sizes on hand.

Types of piping and when to use them
There are a few common piping styles. Each changes the cushion’s look.
- Self-piping: Use the same fabric as the cushion cover for a subtle, seamless edge.
- Contrast piping: Use a different fabric or color for a bold outline.
- Welt piping: Made with cord wrapped in fabric. It creates a rounded ridge.
- Flat piping: No cord inside. Good for a low-profile finish or lightweight fabrics.
- Knife-edge piping: Narrow and sharp-looking; works well on modern cushions.
I prefer self-piping for classic pieces and contrast piping for accent cushions. The type you pick affects how you cut and sew.

Step-by-step: How to make piping for cushions
Follow these steps to make piping and prepare it for sewing.
- Cut fabric strips
- Cut strips 1/2 inch to 3/4 inch wider than the cord on each side. For example, cut 1 inch to 1 1/2 inch wide for small cord. Use bias cuts for curves and straight grain for straight edges.
- Fold and press
- Fold the strip lengthwise wrong sides together and press a sharp crease. This helps wrap cord evenly.
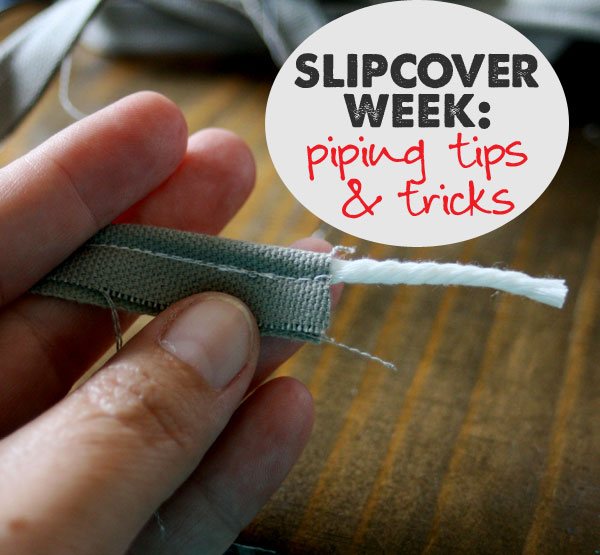
- Encase the cord
- Place the cord along the folded edge. Wrap the fabric around the cord so the cord is centered in the fold.
- Machine stitch the piping
- Use a piping foot or zipper foot. Stitch close to the cord, catching the fabric edge and keeping the seam even.
- Trim any excess
- Trim loose threads and press the piping to flatten the seam. Keep piping lengths long enough to fit around the cushion edges with extra to join.
I make piping in long lengths and store it on a roll. That saves time when I make several cushions. Cutting strips a bit wider at first gives you margin to adjust.

How to sew piping into cushion covers
Attaching piping properly makes the finish look professional. These steps show how.
- Mark placement: Use pins to mark where piping will sit relative to the seam allowance.
- Pin piping to the right side: Align raw edges of piping with raw edges of the cushion fabric, cord facing inward. Pin or clip every 2–3 inches.
- Stitch with the proper foot: Use a zipper or piping foot and stitch with the cord just inside the needle path so that the cord sits in the seam.
- Match seams at corners: Stop with needle down before you reach a corner. Lift the presser foot and pivot, or make small snips into the seam allowance to ease the piping around tight corners.
- Join ends: For a clean join, overlap piping ends and stitch them with the cord ends butted together or miter the fabric so the join sits flat inside the seam.
- Sew final seam: With piping attached to one cushion piece, place the other piece right sides together and sew the entire seam, catching the piping in your stitch.
On my first cushions I sewed too far from the cord. That left the piping loose. Now I stitch close and use a piping foot for a snug fit.

Tips, troubleshooting, and common mistakes
Small fixes prevent big problems. Use these tips while you learn how to make piping for cushions.
- If piping twists while sewing, reduce fabric strip width or press more firmly before stitching.
- For smooth corners, clip small notches into seam allowance and press gently.
- If you see gaps where piping meets, trim and rejoin with a slight overlap and reinforce with a few hand stitches.
- Use matching thread if you want seams to blend. Use contrasting thread for an intentional look.
- Test on scrap fabric before working on the final cushion to adjust stitch length and pressure.
A common mistake is rushing the join. Take time to fit the ends and press seams flat. This makes cushions look handmade and well made.
Finishing and care for piped cushions
Final steps make the cushion ready to use and last longer.
- Trim seam allowance to 1/4 inch where possible to reduce bulk.
- Turn the cushion cover right side out and use a blunt tool to push corners crisp without splitting the piping.
- Topstitch close to the piping if you want it locked in place and decorative.
- Care: Wash according to fabric type. Gentle cycle and low heat help protect piping. Spot clean delicate trims.
- Storage: Store piped cushions flat to avoid crushing the cord.
I always topstitch thin piping on throws that will get heavy use. It keeps the piping neat and stops edges from rolling.

Frequently Asked Questions of How to make piping for cushions
What size fabric strip should I cut for piping?
Cut strips about 1/2 inch to 3/4 inch wider than the cord on each side. Use bias strips for curves and straight-grain strips for straight edges.
Can I make piping without a piping foot?
Yes. You can use a zipper foot to stitch close to the cord. A piping foot makes it easier but is not required.
How do I join piping ends neatly?
Overlap or miter the fabric at the join and stitch through the cord ends. Trim excess and press the seam flat for a clean finish.
Should I use the same fabric for piping as my cushion?
You can. Self-piping gives a subtle look while contrast piping adds visual interest. Choose based on style and durability.
How do I make piping around tight corners?
Clip small notches in the seam allowance and ease the piping into place. Use a bias strip for the most flexibility around corners.
Conclusion
Making piping for cushions is a small skill that makes a big difference in finish and style. Start with the right tools, practice the wrap-and-stitch steps, and take time on joins and corners. Try one cushion as a test piece and build confidence from there. Ready to upgrade your cushions? Try making a simple self-piped throw pillow this weekend and share your results or questions below.

Daniel Hart is a consumer product analyst who specializes in mattress technology, smart bedding, and home comfort innovation. Before joining Royal Comport, Daniel worked with several e-commerce research teams, testing and comparing sleep products for quality, value, and long-term performance. He brings data-driven insight and real-world testing to every review he writes.


