

Your couch cushions have seen better days. They've flattened out, the fabric has faded, and every time you sit down you sink into a lumpy mess. You could buy new ones, but that gets expensive fast.
The better option? Make your own. It's a weekend project that can save you hundreds of dollars, and the results can look professionally made. I've built cushions for everything from a worn-out sectional to a custom bench seat, and the process is more straightforward than most people expect. You can also read our guide on how to deep clean couch cushions.
This guide walks you through the entire process from start to finish: measuring, choosing materials, cutting foam, sewing covers, and adding those finishing touches that make your work look store-bought.
Lay out all your tools and materials before starting — it saves time and prevents mid-project trips to the store.
Materials and Tools You Need
Before you cut a single piece of fabric, gather everything you'll need. Nothing kills momentum like discovering you're out of thread halfway through sewing a seam. For more on this, see our guide on how to make couch cushions softer.
Fabric:
- Upholstery-weight cotton, linen, canvas, or outdoor fabric — these stand up to daily use
- Polyester blends with a tight weave offer good durability and stain resistance
- Remnant pieces work well for small accent or throw cushions
Filling Options:
- High-density foam (1.8–2.5 lb/ft³) for seat cushions
- Polyester fiberfill or a down alternative for back and throw cushions
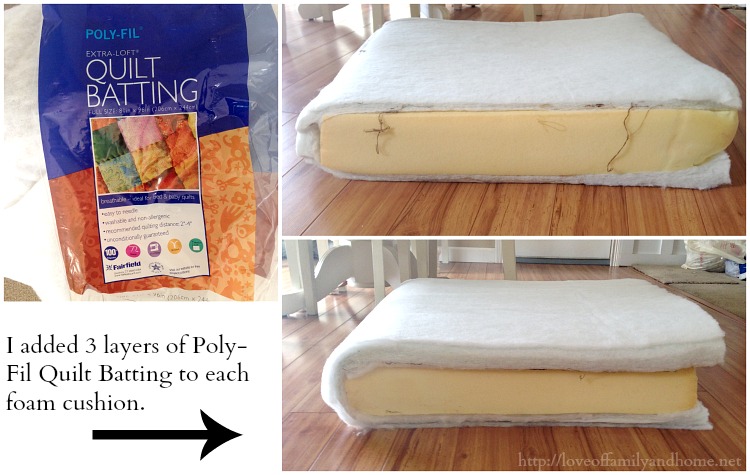
- Foam wrap or batting to soften sharp edges and create rounded corners
Hardware and Notions:
- Zippers — invisible or heavy-duty, depending on the look you want
- Velcro or hook-and-loop tape as an alternative closure
- Upholstery thread — this is stronger than regular thread and handles thick fabric better
- Heavy-duty sewing machine needles (size 90/14 or 100/16)
Tools:
- Sewing machine that can handle thick fabric layers
- Scissors or a rotary cutter with a cutting mat
- Measuring tape, pins, chalk or fabric marker
- Serrated knife or electric foam cutter for shaping foam
- Spray adhesive for attaching wrap to foam (optional)
- Dust mask and safety glasses for foam cutting
Pro tip: Keep a few extra zippers and matching thread on hand. When you're mid-project and a zipper breaks, having a backup saves you from an emergency trip to the fabric store.
How To Measure Your Couch For Custom Cushions
Accurate measurement is the foundation of a good cushion. Getting this wrong means covers that bag, foam that bulges, or cushions that slide around. For more on this, see our guide on how to make couch cushions more comfortable.
Measuring the Seat
Start with the seat base, not the old cushion. Cushions compress and shift over time, so older cushions can mislead you.
- Measure the width from one side of the seat to the other
- Measure the depth from the front edge to the back of the seat
- Measure the height you want the finished cushion to be — 4 to 6 inches is standard for seat cushions
For a couch with multiple cushions, measure each seating position separately. They might look identical, but slight variations are common, especially in older frames. For more on this, see our guide on how to clean couch cushions from pee.
Account For Gaps and Armrests
Your couch has curves and corners that a flat measurement won't capture:
- Check for gaps between cushion positions — these usually range from 1/4 to 1/2 inch
- Measure around armrests — some cushions need to tuck under or wrap around them
- Note any taper where the seat narrows toward the back
Choosing Cushion Types
The type of cushion changes how you measure and build:
| Cushion Type | Typical Dimensions | Fill Material |
|---|---|---|
| Seat cushion | 20–24" wide, 20–24" deep, 4–6" thick | High-density foam |
| Back cushion | 18–22" wide, 6–10" deep, 4–8" thick | Softer foam or fiberfill |
| Throw cushion | 16–22" square | Polyester fiberfill or down alternative |
Seam Allowance and Fit
Here's where DIY cushions often go wrong:
- Add 1 inch to width and height measurements for seams and ease
- Subtract 1/4 to 1/2 inch from foam dimensions when making the cover for a snug fit
- Add extra if you're using piping or thick batting around the foam
A common mistake is adding seam allowance and ease, ending up with covers that are baggy. A snug fit looks better and wears longer. When in doubt, test on muslin first.
I once skipped measuring twice and cut foam that was a full inch too wide. The cover fit, but the cushion bulged and looked overstuffed. Measuring twice, especially for odd-shaped corners, saves hours of rework. For more on this, see our guide on how to clean feather couch cushions.
Choosing The Right Foam For Couch Cushions
Foam is the heart of your cushion. It determines comfort, support, and how long the cushion keeps its shape.
Foam Density Matters
Not all foam is created equal. When shopping, you'll see numbers like "1.8 lb/ft³" — that's the density, and it matters more than firmness.
- Seat cushions: Use 1.8 to 2.5 lb/ft³ high-density foam. It bounces back after sitting and lasts years longer than cheaper foam.
- Back cushions: Softer foam, around 1.2 to 1.8 lb/ft³, provides comfort without pushing you forward.
- Throw cushions: Any firmness works, but since they're decorative and not sat on all day, budget options are fine.
Foam Types Compared
Each foam type has different trade-offs:
- Polyurethane foam: The most common and affordable option. Good support, but density varies widely — read the specs, not just the price.
- High-resilience (HR) foam: More expensive, but holds its shape better and feels more buoyant. Worth it for cushions you sit on daily.
- Memory foam: Great for pressure relief, but can feel dense and "dead" on a couch. It also holds heat, which may be uncomfortable.
- Polyester fiberfill: Not true foam, but a budget-friendly option for back cushions. Requires regular fluffing.
For a couch you use daily, don't skimp on foam. A cheaper foam that flattens in six months costs more over time than quality foam that lasts for years.
Cutting Foam Cleanly
Cutting foam neatly takes the right tools:
- Score the surface with a serrated knife or electric foam cutter along your marked line
- Work in a well-ventilated area and wear a dust mask — foam particles are irritating
- Cut slightly outside your line, then trim down for a precise edge
For very thick foam, an electric carving knife works surprisingly well. The wide blade keeps cuts straight and reduces sawing motion.
Step-By-Step: How To Make Cushions For Couch
Now the real work begins. These steps create a basic boxed seat cushion with a removable cover — the most common style for couches.
Step 1: Mark and Cut the Foam
- Mark your dimensions directly on the foam with a marker or chalk
- Cut with a serrated knife, electric foam cutter, or electric carving knife
- Wrap the foam in batting if you want softer edges — secure with spray adhesive
Check your work: Place the foam on the couch seat and confirm it fits properly before sewing fabric. Adjusting foam now is simple; adjusting a finished cover is not.
Step 2: Cut the Fabric
For a boxed cushion, you need three pieces:
- Top panel: cushion width + 1 inch seam allowance, by cushion depth + 1 inch
- Bottom panel: same size as top
- Side panel strip: perimeter of cushion + 1 inch for seam, by cushion thickness + 1 inch
If you're adding piping, cut bias strips from coordinating fabric and sew them around the top and bottom panels before assembly.
Step 3: Sew the Cover
- Pin the side strip to the top panel, right sides together
- Sew with a 1/2 inch seam allowance, easing the strip around corners
- Attach the bottom panel the same way, leaving one seam open for the closure
Step 4: Install the Zipper
Zippers are easier to install before the cover is fully assembled:
- Sew the zipper into one seam of the side strip before attaching the bottom panel — this is the cleanest approach
- Or leave the back seam open and sew the zipper in after assembling the rest of the cover
- Use a zipper foot on your machine for accurate stitching
A full-length zipper is worth the effort. It makes washing the cover and replacing foam much easier down the line.
Step 5: Insert the Foam
- Turn the cover right-side out
- Fold the foam in half and slide it through the zipper opening
- Unfold the foam inside the cover and smooth out any wrinkles
For dense foam that's hard to compress, try inserting a freezer bag corner-first — the slick plastic lets the foam slide through the opening more easily.
Step 6: Final Fitting
Place the finished cushion on your couch and evaluate:
- Does it sit flat without bulging?
- Do the corners look defined?
- Can you see the zipper or other hardware?
If the cover is too tight, remove the foam and ease the seams. If it's too loose, take it in slightly at the seams.
Sewing Techniques and Finishing Touches
The details separate a homemade cushion from one that looks professionally made. Master these five techniques and your work will stand out.
Piping and Welting
Piping (also called welting) adds a crisp edge that defines the cushion silhouette. It's not just decorative — it reinforces the seam and helps the cushion hold its shape.
To make your own piping:
- Cut fabric strips on the bias (diagonally across the fabric grain) — this lets them curve around corners smoothly
- Fold the strip over cotton cord and stitch close to the cord with a zipper foot
- Baste the piping to the seam line before sewing panels together
Store-bought piping is available, but making your own lets you match fabrics exactly and create contrast piping for a custom look.
Boxed Corners
Boxed corners give cushions their structured, tailored appearance:
- Decide how deep you want the corner to match your foam thickness
- Fold the fabric corner into a triangle so the seam aligns
- Sew straight across the fold at your measured depth
- Trim excess and press
The key is consistency — measure every corner the same way so all four match perfectly. Mismatched corners are immediately noticeable on a finished cushion.
Tufting and Buttoning
Tufting pulls the cushion top down into the foam, creating a classic diamond pattern that's both decorative and functional.
- Mark your button positions in a grid using tailor's chalk
- Thread a needle through the fabric and foam, pulling tight
- Attach buttons on both sides or use pre-made tufting buttons with a kit
For a modern look, use a single button centered on each cushion. For traditional styling, use three or five buttons in a row.
Reinforcement
Cushions take constant stress at the seams. Reinforce these areas:
- Backstitch at both ends of every seam — regular forward stitching can unravel with wear
- Use upholstery thread — it's significantly stronger than all-purpose thread
- Add interfacing to stress points like corner seams and zipper openings
- Double-stitch high-wear seams instead of single stitching
Skip piping if you must, but don't skip reinforcement. Durable seams are what let a cushion survive years of daily sitting.
Cushion Styles: Making Other Types
The boxed cushion style above works for most couches, but a few variations are worth knowing:
Envelope Closure Cushions
Simpler than zippers, envelope closures use an overlapping flap of fabric at the back of the cushion:
- Cut the bottom panel as two overlapping pieces
- Hem the overlap edges
- Place the overlap at the back of the cushion where it won't show
This style takes less time, needs no hardware, and works well for throw cushions or beginners.
Attached Cushions
For a streamlined look, cushions can be sewn directly to the couch frame. This is more complex and requires:
- An upholstery staple gun
- A solid understanding of couch frame construction
- Careful planning for how the fabric flows over both cushion and frame
Attached cushions are harder to clean and replace, so most DIYers prefer removable covers.
Back Cushions
Back cushions are essentially large pillows:
- Cut front and back panels the same size plus seam allowance
- Sew three sides, right sides together
- Turn, insert fiberfill or soft foam
- Sew the fourth side closed by hand with a blind stitch
Loose fiberfill gives a plush feel but needs fluffing. A soft foam core wrapped in fiberfill gives structure with a soft surface.
Care, Maintenance, and Making Cushions Last
Your homemade cushions will last longer with regular care. A few minutes of maintenance each week pays off in years of extended life.
Weekly Care
- Rotate cushions weekly to distribute wear evenly — this is the single most effective habit
- Flip cushions if the covers allow it, so both sides wear at the same rate
- Vacuum fabric regularly to remove dust and dirt that grind into fibers
Cleaning Methods
Always check fabric care labels before cleaning. Different materials require different approaches:
- Vacuum with an upholstery attachment on both sides
- Spot clean stains immediately — the longer they sit, the harder they are to remove
- Machine wash removable covers on a gentle cycle in cold water
- Air dry covers flat — heat from a dryer causes shrinkage and fabric breakdown
Pre-washing fabric before sewing is essential. Fabric that shrinks after the cover is made will pull the seams and ruin the fit.
Foam Care and Replacement
Foam lasts a long time, but not forever:
- Air foam out when you wash covers — humidity builds up in foam and can cause odors
- Replace foam when it sags visibly, becomes uneven, or loses its bounce
- Expect 3 to 8 years of life from quality foam, depending on use and body weight
Add a habit of checking your cushions for wear every few months. Catching problems early means fixing a seam instead of rebuilding a cushion.
Common Mistakes and Troubleshooting
Learn from others' mistakes instead of making your own. These are the most common issues I've seen DIYers run into.
Wrong Foam Density
Problem: Cushion feels too soft and you sink to the frame, or too firm and uncomfortable.
Fix: Choose foam density based on how the cushion is used. Daily-sitting seat cushions need 1.8 lb/ft³ density minimum. Decorative throw cushions can use lighter foam.
Poor Measurements
Problem: Cover fits too tight, making the cushion bulge, or too loose, creating wrinkles and bagginess.
Fix: Add seam allowance to all measurements, then test-fit with a cheap muslin cover before cutting your good fabric. Adjust the muslin pattern until the fit is right.
Weak Seams
Problem: Seams split at the corners or where the zipper attaches.
Fix: Backstitch every seam end, use upholstery thread, and consider reinforcing with interfacing. Thin thread and short stitches are the usual culprits.
Zipper Problems
Problem: The opening is too short to insert the foam, or the zipper is crooked.
Fix: Install a full-length zipper spanning the entire seam opening. A shorter zipper makes foam removal and insertion needlessly difficult.
Fabric Shrinkage
Problem: Cover fits fine on day one, then shrinks after washing and no longer fits the foam.
Fix: Pre-wash all fabric before cutting. Skip this step and you risk your finished cover shrinking unevenly the first time you clean it.
Materials Cost and Time Estimates
One of the biggest advantages of making your own cushions is cost savings. Here's what to expect.
What It Costs
| Item | Price Range |
|---|---|
| Fabric | $10–$50 per yard, depending on quality |
| Foam | $20–$100 per cushion, based on size and density |
| Zippers and notions | $2–$10 each |
| Piping cord | $3–$8 per pack |
| Batting | $10–$20 per roll |
Total Project Costs
- Throw cushion: $10–$30
- Standard seat cushion: $30–$100
- Full couch set (3–5 cushions): $150–$400
Compare that to buying replacement cushions for a full couch, which typically costs several hundred dollars or more. Making your own saves a significant amount.
How Long Does It Take?
- Throw cushion: 1–2 hours
- Boxed seat cushion with zipper: 2–4 hours for a beginner
- Back cushions: 1–3 hours
- Full couch set: A solid weekend or two, including shopping time
Ways To Save Money
- Use fabric remnants from discount bins for throw cushions
- Buy foam in sheets at wholesale prices and cut it yourself
- Skip piping for a simpler look and lower cost
- Mix a consistent color with accent fabrics for contrast without buying extra yardage
Interesting finishes like contrast piping or tufted buttons add a premium look without much extra cost.
Frequently Asked Questions
What type of foam is best for couch seat cushions?
High-density foam (1.8–2.5 lb/ft³) is best for seat cushions. It maintains its shape under repeated sitting and provides proper support. Softer foam works better for back cushions or decorative throw pillows.
How much seam allowance should I add when making cushion covers?
Use a 1/2 inch seam allowance for most cushion covers to balance durability and ease of sewing. If your machine handles thick fabric well and you're experienced, 3/8 inch works too. Reaching for covers with piping or batting means adding a bit extra.
Can I wash cushion covers in a washing machine?
Many removable covers can be machine washed on a gentle cycle in cold water, but always check the fabric care label first. Lay flat to dry instead of using the dryer — heat shrinks fabric and can damage zippers.
How do I measure for a snug cushion cover?
Measure the foam cushion dimensions, then subtract 1/4 to 1/2 inch from each dimension when cutting your fabric. This tension keeps the cover smooth and tailored. Test with a scrap fabric sample before committing to your main fabric.
Is it better to use a zipper or envelope closure?
Zippers give a neater appearance and easier foam removal — better for seat cushions you'll wash and maintain. Envelope closures are simpler and need no hardware — better for throw cushions and quick projects.
How often should I replace foam in couch cushions?
Replace foam when it sags, becomes uneven, or loses support — typically every 3 to 8 years with regular use. Rotating cushions and flipping them periodically extends foam life by distributing wear.
Conclusion
Making your own couch cushions is one of the most satisfying DIY upholstery projects you can take on. It's practical, budget-friendly, and delivers immediate visual impact.
Start with a solid plan. Choose high-density foam for seats, durable upholstery fabric, and the right tools. Measure carefully — this step prevents the most common failure points. Build with reinforcement and quality materials so your cushions hold up for years.
Begin with one cushion to build confidence, then expand to a full set. Each cushion gets easier as you refine your technique. A weekend of work will transform your living space, and the skills you learn will apply to benches, chairs, window seats, and outdoor furniture for years to come.
Ready to start? Gather your tools, measure your couch, and make your first cushion this weekend. The satisfaction of sitting on something you built with your own hands beats any store-bought result.

Daniel Hart is a consumer product analyst who specializes in mattress technology, smart bedding, and home comfort innovation. Before joining Royal Comport, Daniel worked with several e-commerce research teams, testing and comparing sleep products for quality, value, and long-term performance. He brings data-driven insight and real-world testing to every review he writes.


